


No decision model should be an island that’s isolated from other business processes. Decision models belong as part of larger analytics workflows. For example, a machine learning model forecast feeds a decision model that generates workforce schedules, that kicks off an acceptance test for result validation. Or perhaps fetching a large dataset from a database, partitioning it into smaller ones, solving a routing problem as regional subsets, and then aggregating those results for holistic visualization in the end.
While incredibly beneficial to business outcomes, the workflow and testing infrastructure often require a large investment to stand up, streamline, and maintain. With Nextmv, these capabilities become turnkey.
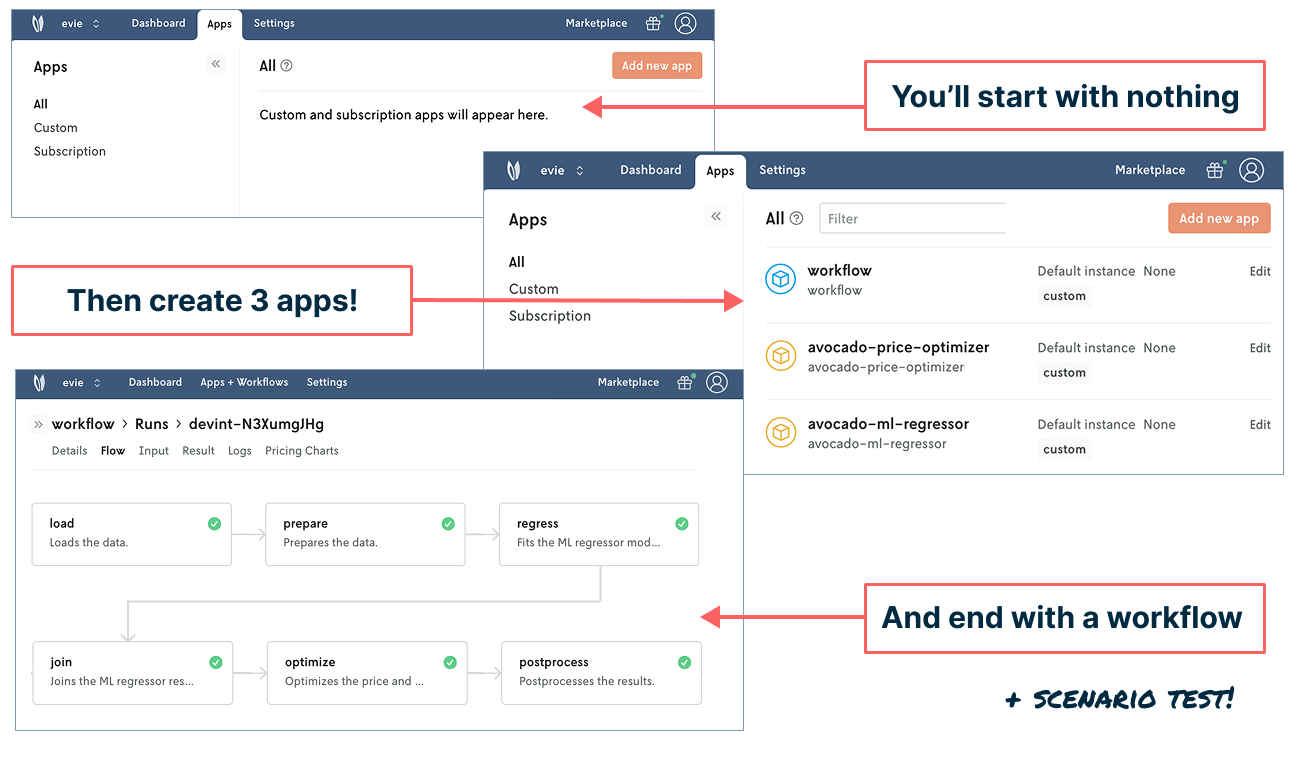
In this blog post, we’ll walk through creating an automated, end-to-end decision workflow in Nextmv using example code provided by Gurobi. By the end, you’ll have two model applications and one workflow application live in Nextmv and will have conducted a scenario test that reveals useful insight into the profit-price relationship of avocados.
Achieving this outcome is relatively speedy. But first, let’s set some context before we hit “play” and run it end to end.
Problem setup: Do we add a new supplier?
For this walkthrough, let’s imagine you work at the Farm Share Company, which delivers farm fresh goods such as produce, preserves, and dairy to customers’ homes. You’re a decision modeler responsible for product price optimization. Management has found a new supplier of avocados and wants to understand how increasing supply of avocados impacts downstream KPIs such as waste and profit.
To answer this question, you know you ultimately need to run a scenario test that varies the supply of avocados. But there are precursor steps that involve setting up a workflow that connects the necessary data and models together.
You have previous experience building out all the infrastructure needed to make this possible: it’s time-intensive and distracts from your primary work of modeling. In your current role, you use Nextmv to move faster and improve more business outcomes, sidestep the process of puzzle-piecing together input sets, and reduce the time asked of engineering to support your projects.
Notebook setup: Gurobipy, Statsmodels, Nextmv
The Decision Science team you’re on uses a variety of open source and commercial tools. For this particular decision workflow, you’re using the following:
- Gurobipy optimizer that optimizes the price and supply of avocados per region
- Statsmodels regressor that characterizes the relationship between price and demand of avocados
- Nextmv DecisionOps platform for model and workflow management, plus testing
Our starting point today is this Jupyter notebook from Nextmv on Google Colab (which is based on this original example from Gurobi). If you were to compare the two side by side, you’d see it’s mostly the original Gurobi code and a few additional lines of code that hook everything into Nextmv. These minor Nextmv modifications — or what we call “Nextmv-ifying” steps — allow for remote deployment, remote runs, observability and monitoring, automated workflows, model management, experimentation, and collaboration.
(Note that while we’re using a notebook with the Nextmv Python SDK to bring our model code to Nextmv in this tutorial, it’s not the only way. You can also work directly with the Nextmv Python SDK, the Nextmv CLI, or start with a customizable template in the Nextmv Marketplace.)
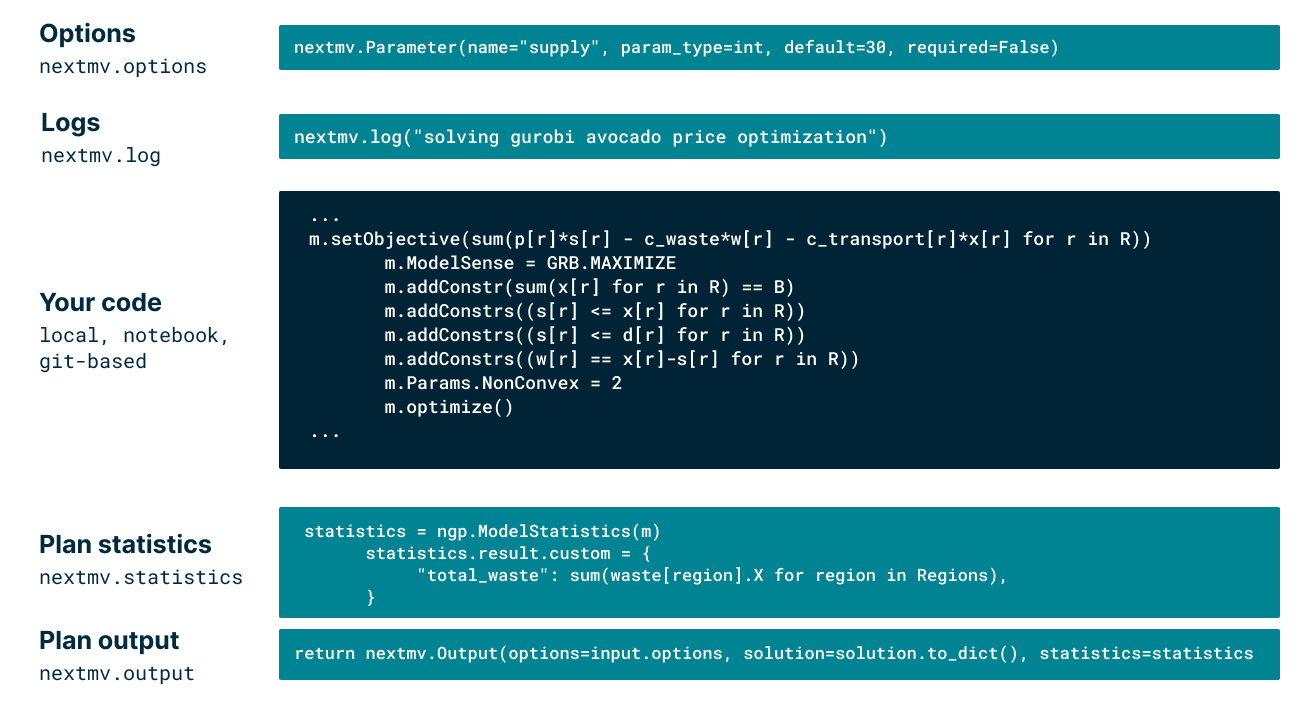
A simplified view of the code breakdown is as follows:
The notebook includes a lot of details about what’s happening at each step that you can dive into in just a moment. (You can also watch this video, which walks through the entire tutorial with additional context and voice over.) At a high level, however, here’s what to know:
Part 1 covers deploying the ML regressor model
This includes installing all of the required packages from Gurobi and Nextmv, loading and manipulating the original dataframe, training and testing the regression model, and the Nextmv-ification pieces for reading input, writing output, redirecting logs, and exposing statistics (along with a few custom stats we added). The data is also decoupled from the model as best practice.
Note: This example trains and tests the regressor within the same application — you don’t have to do it this way. If you’re using an MLOps flow to do this, you can still load the ML model from the outside to Nextmv and have it trained elsewhere. MLOps and DecisionOps go hand-in-hand.
Part 2 covers deploying the avocado price optimizer
This includes a lot of the same pieces above, with two bonus items: 1) exposingc an option for total amount of avocado supply (to make experimentation later super smooth) and 2) using the Nextmv Gurobipy package to preload all Gurobi solver options. We’ll also expose some custom assets for Plotly visualization.
Part 3 covers the structure and deployment of the decision workflow
This is the section that links our two distinctly managed applications together into a larger workflow: load data > prepare data > regress > join fitted coefficients with the optimizer input data > solve the optimization > post process results. This is all powered by the nextpipe workflow engine from Nextmv along with some handy secrets setup.
Nextmv setup: Account, plan, copy that API key
Enough context: Now’s the time to spring into action. This tutorial requires that you create a free Nextmv account and start an Innovator plan — 14 days free, cancel anytime. (You can also contact us about a team sandbox space.) When you log in for the first time, you’ll land on the Nextmv Marketplace, a collection of customizable templates, along with a few other menu items we’ll use today.
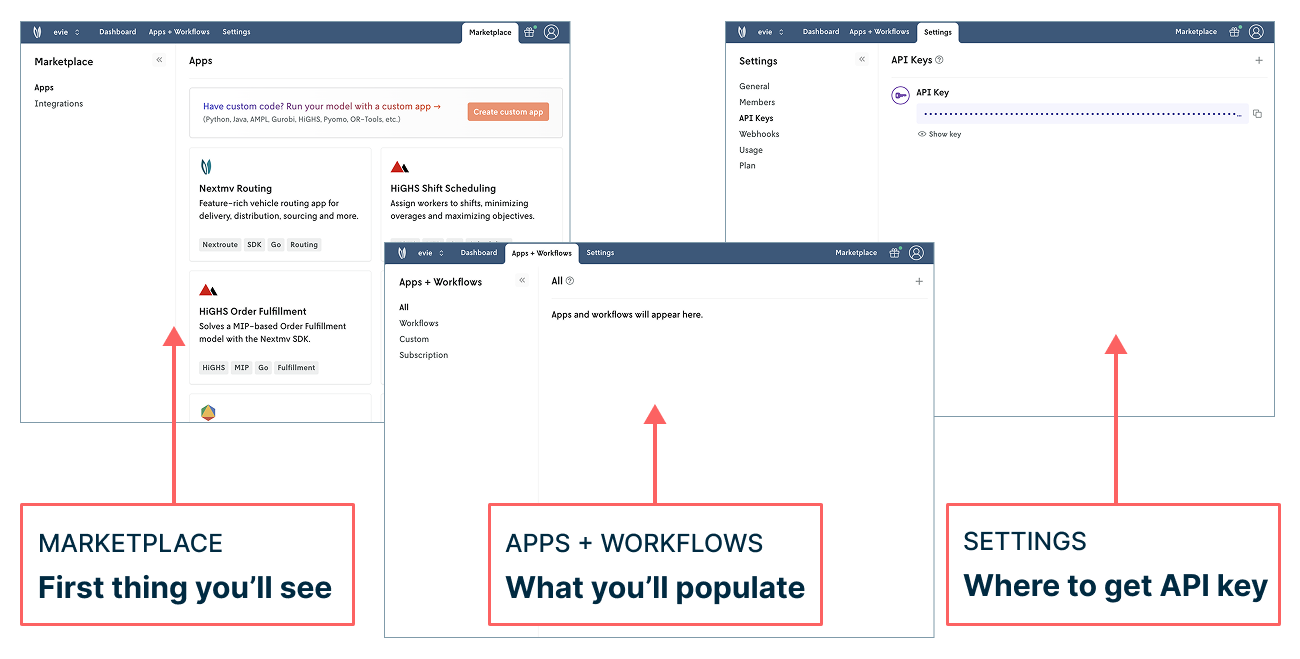
If you click into the Apps + Workflows tab, you'll see that you don't have any apps or workflows yet. For now, go to Settings > API Keys and copy your API key.
And that’s it. Let’s dive into that notebook and watch the magic unfold.
Press ‘Play’ to push and run the workflow!
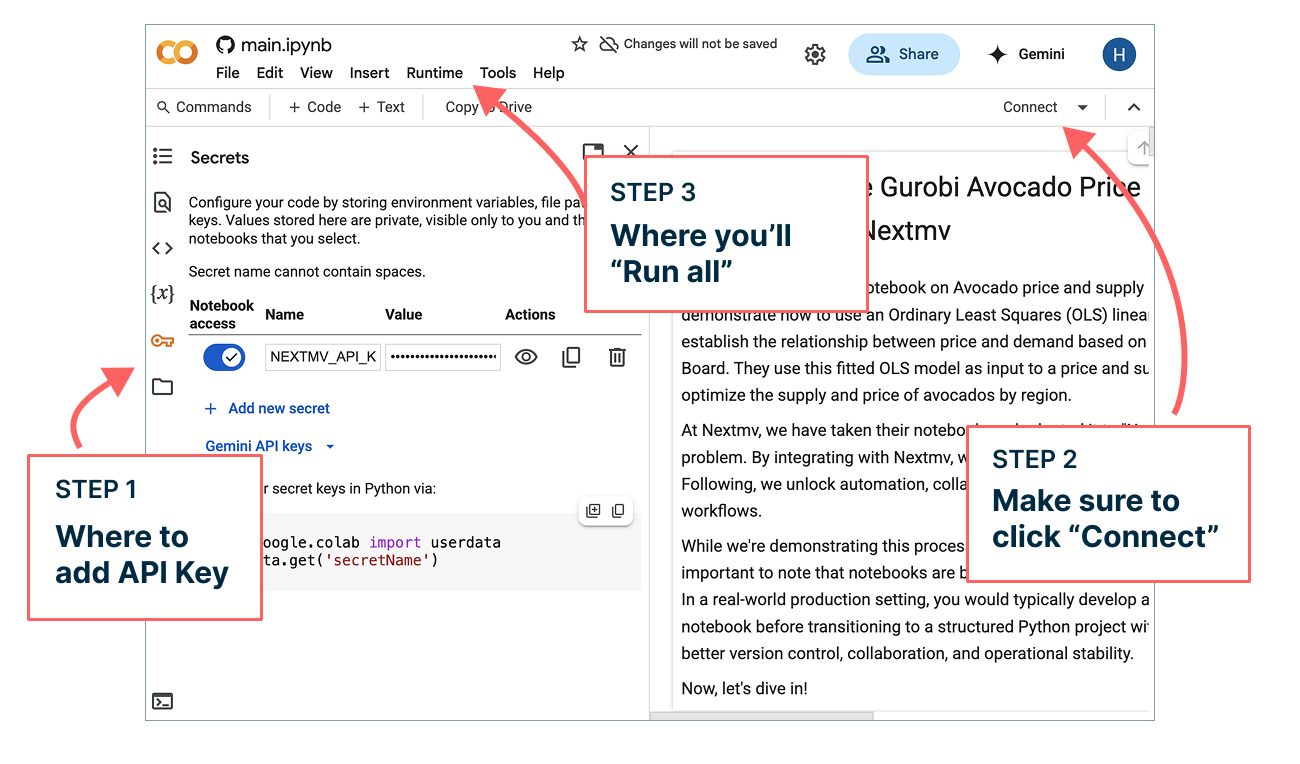
Open up the Notebook on Google Colab. First thing we’ll do (before your clipboard forgets!) is create a secret in the notebook to link it to your Nextmv account. In the left navigation, click on the key icon to expand the Secrets menu:
- Click +Add new secret
- Type in NEXTMV_API_KEY into “Name”
- Copy your API key into “Value”
- Click the “Notebook Access” toggle — it should turn blue
Next, in the upper right corner, make sure to click “Connect” and you should be primed to go. From there, it’s time to run the whole thing and watch the magic unfold. In the “Runtime” menu, select “Run all” and watch things happen.
Depending on your network connection and the Google machines used to run the notebook, completing the full notebook can take up to 10 minutes. (Note: This typically runs faster when you download and run the notebook locally. We're using Colab for ease of demonstration here.) This is a good time to read and inspect the details of each step that we summarized up above. You’ll also want to click over to Nextmv to see apps appear and sample runs execute.

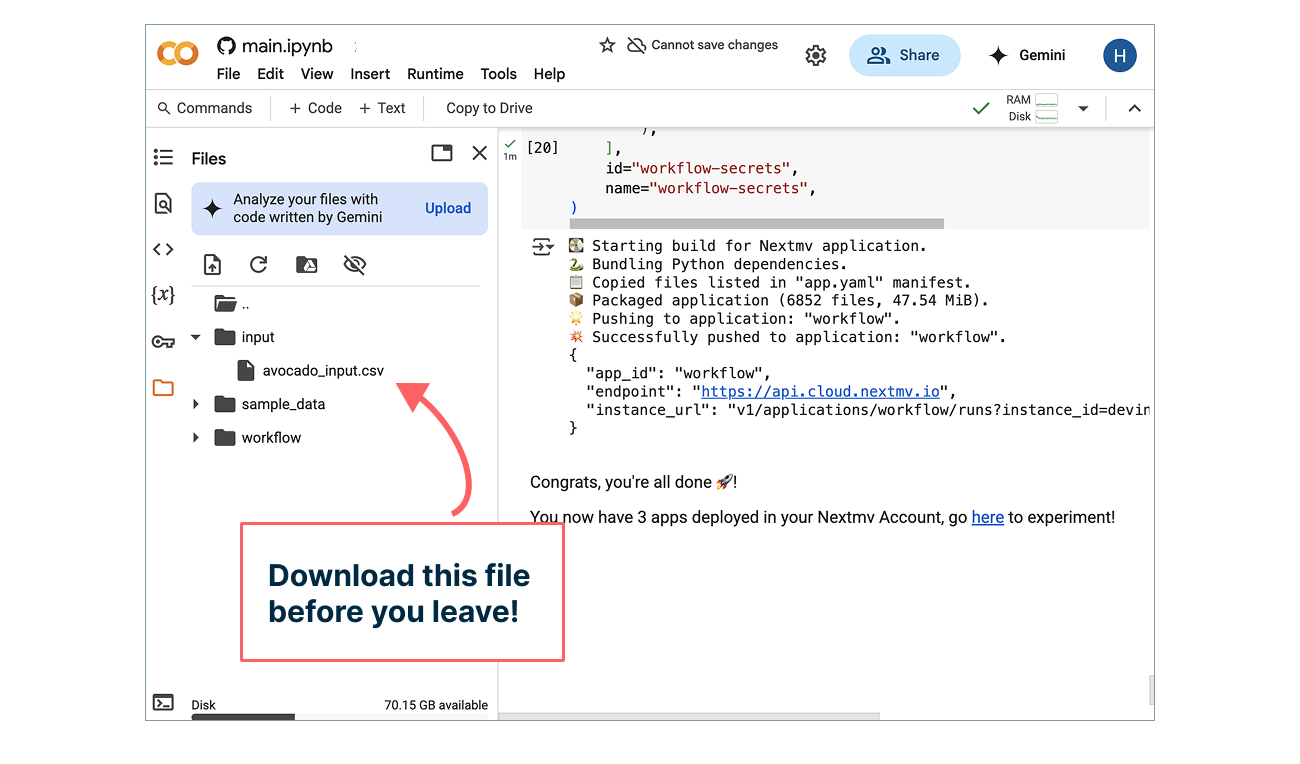
Once the notebook has finished running, you’ll want to do one last thing before returning to Nextmv: download the sample avocado_input.csv — we’ll use this to run our workflow in just a moment!
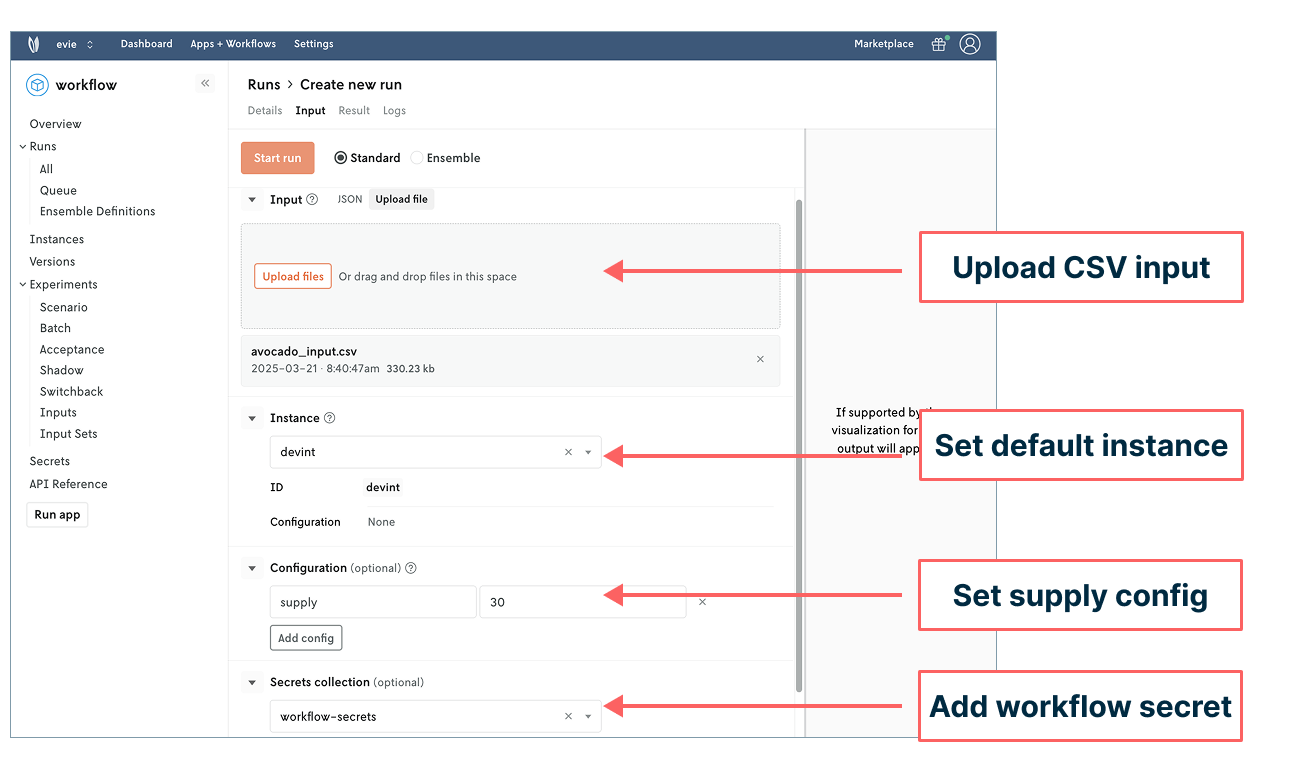
OK, now you’re ready to run the end to end workflow that you can consistently monitor and repeat without any additional code or effort. Click into your workflow app in Nextmv. Create a new run by clicking the + sign in the upper right corner (next to Edit button). And then configure a new run by uploading the CSV file you just downloaded from the notebook, setting the instance to the default devint, setting configuration with supply to 30, and finally adding your workflow secret to give the workflow access to the child apps (regressor and optimizer). Then click “Start run”.
Your workflow is now in progress. You’ll see the run status cycle through different stages alongside all of the details and metadata about the workflow. Once it has succeeded, you’ll be able to click over to the “Flow” tab and see a workflow chart capturing each of the stages. We also slipped in some Plotly visualizations that you can see under the Pricing Charts tab — you can add more charts to this tab or create even more tabs with more charts.

Now, on to our final step of answering our supplier question…
Answer the question: Run the scenario test
OK, you need to get an input set. To do that, click into your price optimizer app. In the left nav under “Runs” select “All” and you’ll see a table appear. Select the run with a Run ID beginning with devint. In the upper right corner of the details page that appears, you’ll see an option to “Download files” next to the “Edit” button. Select the option for “Download Input” and voila!
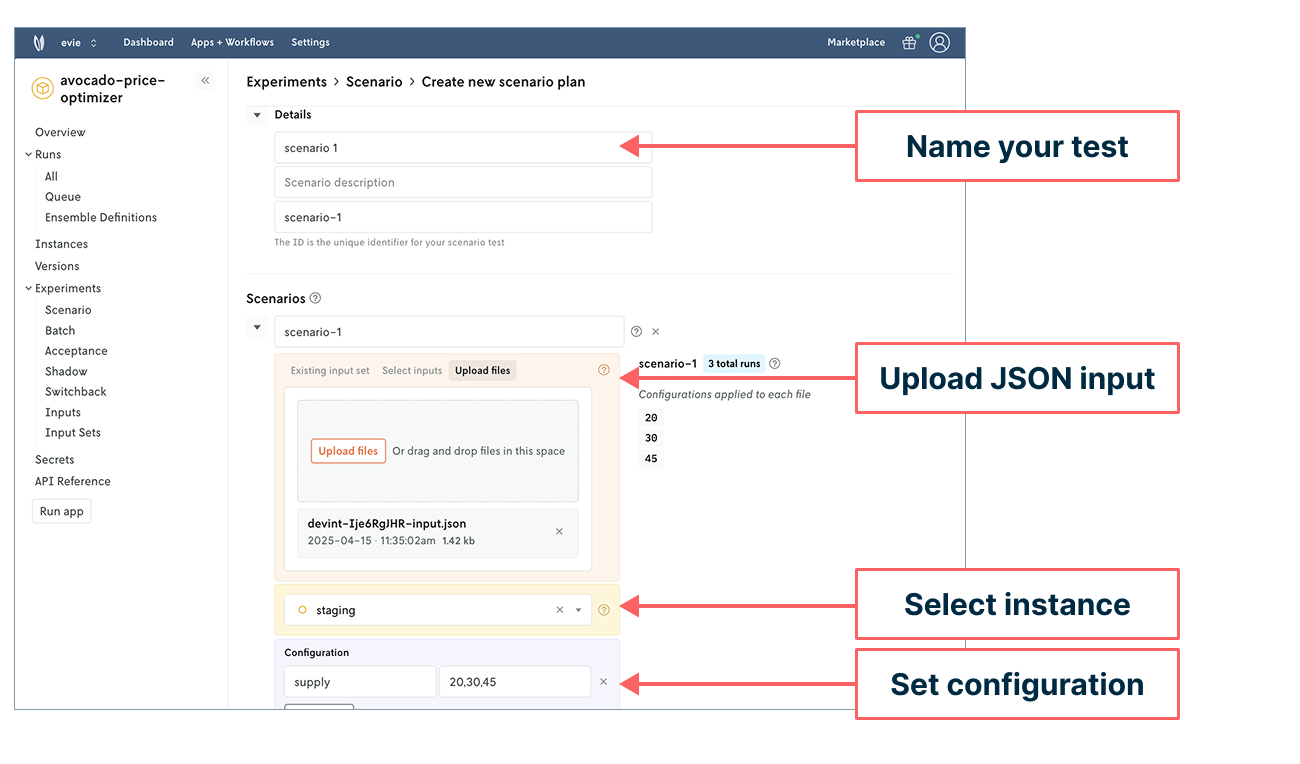
Now, with input in hand, let’s set up our scenario test. In the left nav, under “Experiments” you can click the + sign next to “Scenario” to spin up a new scenario test. You’ll then name your test, upload the JSON input you just got from your run history, select an instance (staging, in this case), and set configuration that varies supply by 20, 30, and 45 million avocados. Click “Create scenario test” and “Confirm” to kick off the runs.
Your results will appear momentarily. They should reveal a pivot table that will initially tell you that profits will only increase with increased supply up to a point: between 30 and 45 million avocados, there’s a drop in profit. Upon further exploration, you can see this is due to increased waste.
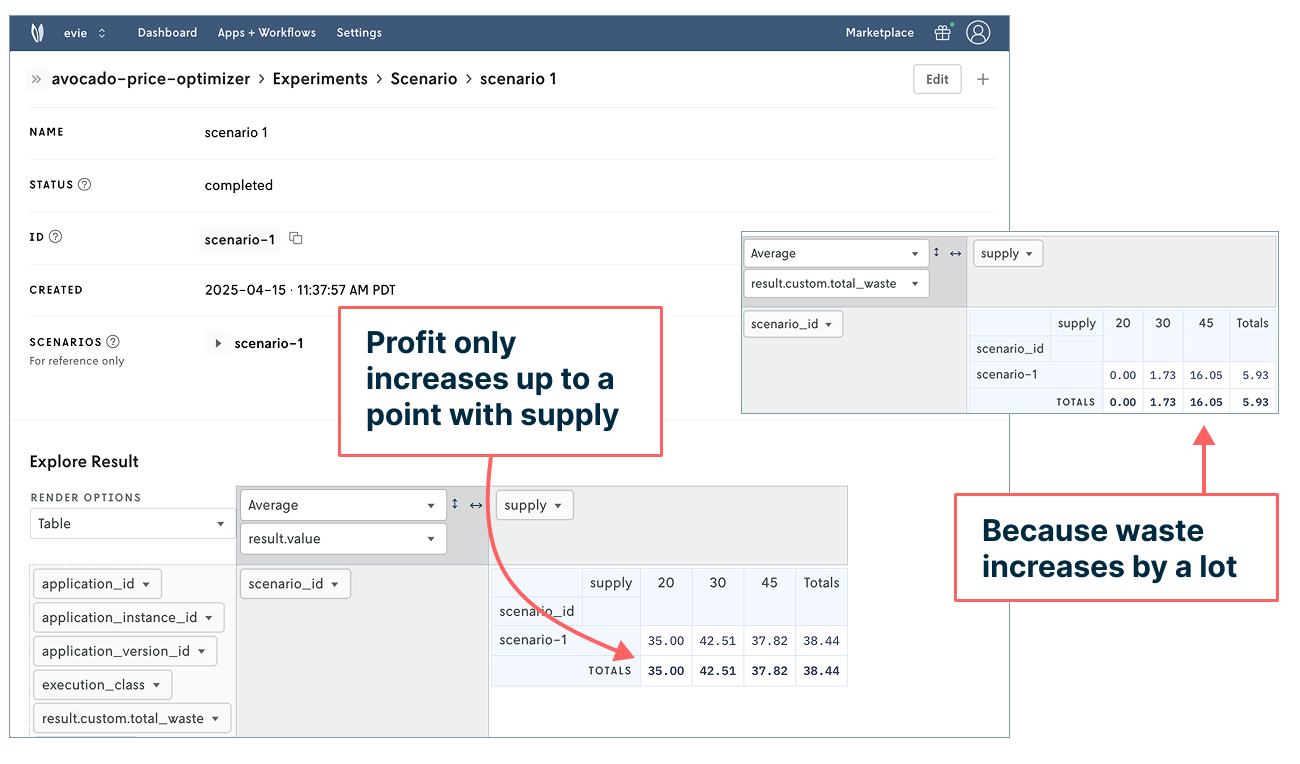
So there you have it. You can return to management and give them an initial answer that a new supplier could indeed be good for business, but only up to a certain point based on current analysis.
To better understand where that tipping point is, you can run a more granular scenario test. In Nextmv, all you have to do is clone your original scenario test and add in additional supply values.
Next moves: Ready player two
Congratulations for accomplishing quite a bit! You started with no optimization infrastructure set up and ended with a complete optimization workflow running in a remote environment that links together a regression model and decision model. You were also able to visualize results using Plotly and conduct a scenario test to determine the relationship between supply and profit — and be able to follow up with management about adding in that new supplier.
The adventure doesn’t stop here, though. Try this flow out with other notebooks or dive right into the Nextmv SDK, CLI, or Marketplace. Since you’re on an Innovator plan, you can also invite a teammate to try it out with you. Just wait until you experience the joy of looking at the same input!
Thanks for following along with this tutorial. Feedback, reactions, and comments are most welcome. May your solutions be ever improving 🖖


